Learn how to seamlessly integrate Bluetooth module with Arduino for wireless communication in your projects.

HC-05 Bluetooth module is used for wireless communication. It is designed to replace the wired connection. It requires a wireless serial connection setup to communicate with devices. HC-05 Bluetooth module can be operated in master or slave configuration. It uses serial port UART to communicate with devices. It can communicate with devices maximum range of up to 10 meters with a data transfer rate of up to 1 Mbps. Because of its amazing features, it is used in multiple applications such as home automation, wireless robots, industrial control units, wireless mouse, GPS receivers, etc.
Pin description


The HC-05 Bluetooth module has 6 pins which are as follows:
EN: If the EN pin is high then it operates under AT commands mode otherwise operates under default data mode. In data mode, only the data can be exchanged among devices with a baud rate of 9600 bps. On the other side in the AT command mode, the setting of HC-05 can be changed according to the need with the baud rate of 38400 bps.
VCC: The power supply pin can be connected with a 3.3-volt or 5-volt voltage pin of the Arduino board.
GND: Used for ground connections.
TXD: Used to transmit serial data.
RXD: Used to receive serial data.
STATE: It is used to provide the connectivity status of whether the Bluetooth module is connected or not.
In this tutorial, I will explain to you a very basic example that will help you to understand the Bluetooth module connectivity with Arduino Uno. In this example, I will operate an LED with the help of my mobile with a wireless connection. I will use the “Arduino Bluetooth controller app” to control the LED operation.
Required Hardware components
1. 1 x Bluetooth module HC-05: BUY ON AMAZON
2.1 x Arduino Uno: BUY ON AMAZON
3.1 x LED: BUY ON AMAZON
4.1 x Android mobile
5.1 x 220-ohm resistor: BUY ON AMAZON
6. Few jumper wires: BUY ON AMAZON
Required software components
- Arduino IDE
- Arduino Bluetooth controller app: Download from here
This is a free app (not made by me) that you can download from the Google play store for free.
Circuit connection
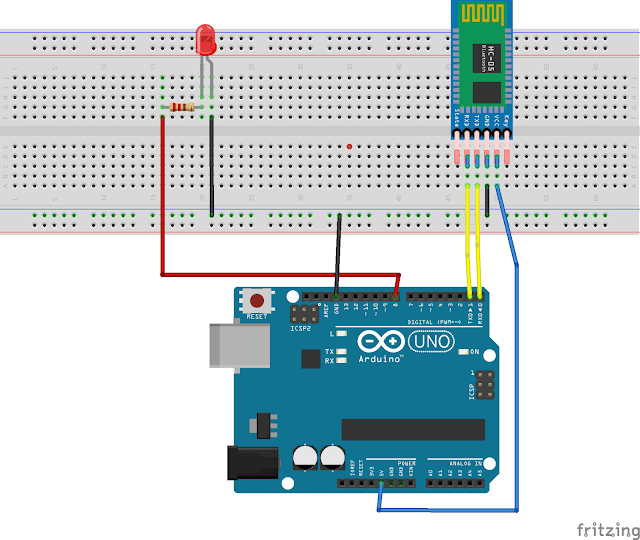
HC-05 Bluetooth module has 6 pins. The VCC pin of the Bluetooth module is connected to the 5-volt power supply pin of the Arduino Uno board. The GND pin of the Bluetooth module is connected to the GND pin of the Arduino. TXD pin is connected with pin 0 (RX) and the RDX pin is connected with pin 1 (TX) of the Arduino Uno board. LED has two legs one is shorter and the other one is longer.
The shorter leg (cathode) is connected to the ground pin of Arduino. The longer leg (anode) is connected with the 220-ohm resistors’ one-end terminal. The other terminal of the 220-ohm resistor is connected to digital pin 8 of the Arduino Uno board. This was all about the circuit connection.
Circuit diagram

Code Click here
/*
*Bluetooth with Arduino uno
*This code describes how an LED can be operated with the help of bluetooth module using Arduino
*
*for more detail please visit:https://www.arduinounomagic.com/2019/02/bluetooth-module-with-arduino.html
*
*Copyright (C) 2007 Free Software Foundation, Inc. <[email protected]>
*for more projects based on Arduino uno please visit: https://arduinounomagic.com/
*/

char BL_DATA=0; //Variable to store recievcd data

void setup()
{
    Serial.begin(9600); //intialize the buad rate for serial communication
    pinMode(8, OUTPUT); //set dgital pin 8 AS OUTPUT
}
void loop()
{
   if(Serial.available() > 0)// Send data (only when data is recived)
   {
    BL_DATA= Serial.read();//Read the  incoming  data and store it in variable BL_DATA

      if(BL_DATA=='1') // Checks whether the value of BL_DATA is equal to 1

         digitalWrite(8, HIGH);//If condition true (BL_DATA=1) then LED turns ON
        }
      else if(BL_DATA=='0') //Checks whether the value of BL_DATA is equal to 0
       {
        digitalWrite(8, LOW);//If condition false (BL_DATA=0) then LED turns Off

   }
}
The code allows us to control the LED connected to pin 8, by pressing 1 or 0. If 1 is entered by the app’s terminal keyboard then the LED gets turned on. In the same manner, if ‘0’ is entered by the app’s terminal keyboard then the LED gets turned off.
Arduino Bluetooth controller app’s important points
- Install the app from the Google Play Store.
- Next turn on your phone’s Bluetooth.
- Select the add a device option.
- Search HC-05 from the paired devices list and add it.
- You will ask for a password then enter the default password 1234/0000 and get connected to it.
- Now you are ready to use the terminal to control Arduino Uno.
Output: Bluetooth Module with Arduino
Check out the video to understand the working of the circuit according to the uploaded code.
Hope you like the Article. If you have any questions let me know in the comments.


 as a switch using Arduino 23")


